Secret Project Glow Cloud (Embroidery)

Page content

All of the stitches in the wearable circuit elements of Secret Project Glow Cloud were simple running stitches, which I tried to keep as consistent as possible. The real embroidery work for the Glow Cloud was concentrated in two decorative elements: the Welcome to Night Vale logo in front of the light sensor, and the cloud design in front of the light circuit.

Putting the “Cloud” in “Glow Cloud”

I waited until very, very late in the project to work on the most stylistically important element - the overlay for the LEDs which would make the whole thing be, recognizably, a cloud, instead of just a bunch of weird-looking lights. I also needed to stuff the space between the overlay and LEDs with some kind of diffusing material, in order to have the LEDs each light up a region of the cloud, rather than appearing as point sources within a dark space. Perhaps because the deadline was looming very close when I began on it, this is the only component which wasn’t taken apart and reworked at least once; the cloud in the final design is the first and only cloud I made.

The cloud’s borders had to be outside of the edges of the outermost LED circuit boards by at least about a half an inch. Rather than try to do anything fancy to calculate and trace it, I just laid down a scrap of linen over the canvas with the LEDs sewn in and traced a pattern that seemed vaguely cloudlike and didn’t overlap any PCB. I ran a simple outline stitch over the pattern I’d traced, then ran some hot glue around the backside of the design I’d stitched in, hoping that it would keep the delicate linen from fraying so much after I cut it. (Thanks to Bob Baddeley for this suggestion; it worked a treat.)

the edge of a piece of linen stretched between two alligator clips, with sewn edging in progress

cloud edge pun here

Finishing the edges for the cloud took quite a while, because the overlay was large and had a fairly complex shape, with lots of scary curves which required me to remove more material than I was strictly comfortable with. Every time I applied the scissors to this piece, I was terrified that I was going to cut the one thread that was holding the whole thing together and wind up with a pile of disconnected thread and floss, bewildered expression on my face, seconds away from beseeching the gods and regretting my hubris. Luckily that didn’t happen, and I managed to finish the edging on the cloud overlay just before the clock struck midnight on January 15th.

The cloud element, pinned onto the larger design, with lights lit beneath.  No diffusing elements are included, so the lights appear to be point sources inside the cloud, with large unlit regions.

Coming together!

Because of the density of the PCB, dried hot glue, and the conductive thread traces on the canvas backing of this design, I had to be a bit parsimonious with the elements I used to sew the cloud into the design. The connecting elements are sewn through the canvas, the (coffee-stained, ugh) layer of linen above the canvas, and the cloud overlay itself. The stitches that hold the cloud in place are also the only thing holding that layer of linen in place, which is fairly amateur-hour; I should’ve at least pinned it on further out.

Once I had the cloud mostly in place, I stuffed some batting in until it looked about the right amount of diffuse, then closed it up and added a few other securing stitches where I had noticed some batting about to escape. Finally seeing this element come together was really wonderful, and I felt for the first time like I might make my January 16, 6pm deadline.

Side view of the cloud element completed; the presence of batting is obvious from the convex shape of the cloud.

Lights out, ready for action!

Logo: Trace, Outline, Fill, Swear, Decompose, Fill, Outline, Fill, Outline

An outline of the Welcome to Night Vale logo traced onto linen with water-soluble marker.  The outermost outline has been further outlined with outline stitch in a vibrant purple which approximates the prominent color of the original design.

Pretty good for eyeballed, right?

This was my first experience trying to recreate a recognizable design in fiber. I didn’t do anything terribly sophisticated to make guides for myself, and as a result you can see that the outlines are a little off, but I soldiered on valiantly anyway.

My general plan for the light sensor and logo was to sew the light sensor, facing forward, into the back of some lightweight linen. I’d connect the four pins of the light sensor to some small metal snap posts, then sew some snap sockets into the canvas onto which I planned to sew the rest of the circuit. I would use an adapted open satin stitch for the fill elements in front of the snaps, so that the snap posts themselves wouldn’t be rendered unusable by the embroidery floss I was using for the fill.

This was the second project on which I had to sew snaps into a wearable electronics project. The first was an unmitigated failure, and this one didn’t go terribly well, either. After getting the snap posts sewn into place, which was an extremely exacting and tedious job, I went to fill the front elements with the stitch I’d hoped to employ. A couple of hours later, I realized I’d made a huge mistake – two, in fact.

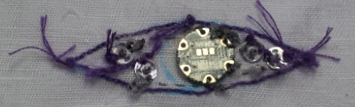
The front of the in-progress Welcome to Night Vale logo, with visible puckering of the fabric where the fill of the sclera element is completed.

First, the stitch I was using for the fill was pulling the fabric out of shape. As I approached the iris of the design and my stitches got longer and longer, they began pulling the edges of the sclera toward one another. If I’d had more clearance in this design, or intended to stitch it onto something else at an intermediate point, this would’ve been less disastrous. Unfortunately, I’d planned to do testing with the snap posts, and the puckering of the fabric was pulling them close enough to one another to short them out.

The other problem probably would’ve been obvious to anyone with any great facility in the third dimension. (This obviously does not describe me.) With the light sensor in the way, how in the hell was I going to do the fill for the iris? Since the light sensor was off-center, it may have been possible to get a needle in for the left side, but it would’ve been impossible to complete the right side. The design was a dead end, unless I wanted to undo all of the sensor work I’d done and redo it. I decided that if I was going to bother doing that, I should do a better overall design.

A laptop screen displays the Welcome to Night Vale banner page.  An embroidery hoop with an outline of the Night Vale logo is placed in front of the laptop screen, superimposing the embroidery over the logo.

High-tech!

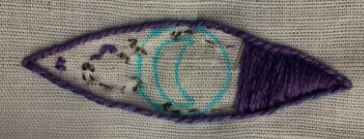
For the second iteration, I just made a patch that vaguely resembled the Welcome to Night Vale logo, leaving the moon design in the middle unfilled. (The need to use a lightweight linen and not fill in the moon was driven by the light sensor I intended to populate behind it - if too many opaque elements were included, the elements obscuring the light sensor wouldn’t admit enough light, and the light sensor would be useless.)

I began by tracing my already-poorly-traced first iteration onto a fresh piece of linen. I also worked from the inside out this time, as I was concerned that I would have trouble with testing and placement since I was keeping the light sensor and the patch disconnected until late in the assembly process. I first ran over the outlines of the moon and iris elements with an outline stitch, then filled the iris in with a horizontal satin stitch. I found the end result unsatisfactorily non-circular, but my friends (who were all, by this point, heartily sick of me tearing parts of this project apart and starting over) convinced me that it was good enough for government fan work. After spending a silly amount of time trying to satin stitch under my outline stitches in the iris, I decided to do the fill stitch first for the sclera.

The Welcome to Night Vale logo beginning to take shape, with the iris filled in and the fill elements of the sclera approximately three-fourths complete.  The borders of the fill do not match the fabric-marker guides for the design.

About six hours in.

Before I laid down a single stitch on the sclera, I counted every single intersection of warp and weft in the linen and recalibrated the design to make sure the endpoints of the sclera and the overall curve would be symmetrical, then laid out some guideposts with pins. I attempted to fill the sclera in with a vertical satin stitch (knowing that attempting a satin stitch over the horizontal distance at the middle would surely pucker the fabric), but I still had significant puckering problems. I ended up filling the sclera in with an extremely tiny horizontal brick stitch, which took approximately forever and was the most effective lesson in the meaning of “labor of love” I think I am ever likely to encounter.

Beginning to work a looped outline element around the freed edges of the design, now freed from the hoop and the larger linen swatch.

This took forever.

Once the sclera was completed, I did an outline stitch around the edges, then cut the design out of the linen. I did all of the edging by hand–I just sewed loops over the outlines, from back to front, all around the edge of the design. I can’t seem to find a name for this stitch, probably because everyone who actually knows something about embroidery uses a less insanely time-consuming method. It would’ve been smart to figure out what that method was at some point during this project, huh?

The logo is pinned in place atop a piece of linen, which is atop the canvas backing.  The light sensor and microcontroller board are visible between the intermediate linen and the canvas.

A look at the fabric sandwich.

Once I had the logo ready to sew onto something, I set up a layer of linen over the electronic elements on the canvas, then pinned the logo in place. The placing of the logo had to be fairly precise, because the unfilled moon element had to be right over the surface-mounted sensor element of the TSL2561. I did a lot of testing in this step, powering up the circuit and running a flashlight back and forth over the logo, to make sure I hadn’t obscured the light sensor.

The logo element is completed and has been sewn onto yet more linen.

All sewn up.

All Together Now

Once both the cloud and the Night Vale logo were sewn onto the linen, I realized I really needed to get the rest of the linen secured to the canvas before I could take everything out of the hoop without worrying about destabilizing the alignment of the fabrics. I did a quick running stitch in a rectangular pattern around three of the edges to keep everything in place. I had to leave the top open so I could run the power cable out of it – I really wish I had had time to make this more elegant.

By the time I had all of this together on the same piece of fabric, it was pretty close to time to go line up for the show. I laid the canvas-components-linen-components-batting sandwich out on a spare purple long-sleeved T-shirt, did a quick fold of the edges, pinned everything in place as best I could without sewing the shirt to itself, and sewed as fast as I could. These two steps were the only place in the project where I would’ve trusted my machine sewing skills, but unfortunately by the time I was ready to do them I was 2,000 miles away from my sewing machine. Hand sewing it is!

The author wearing the finished product, all aglow.

Every stitch lovingly made by hand.

The finished product felt very strange to wear at first, because the canvas was so much heavier than any of the other elements. Additionally, you can see the power cord snaking out from between the canvas and the linen, into my shirt, where I’d shoved a power pack into my bra. (Not the original plan for powering this project, but any port in a storm.) This photo is from about 4:45pm, when I verified that the circuit powered on and responded to light as I expected, then dashed out the door to get the bus to the Night Vale show.

At the show, someone said “I would’ve just stuffed a bunch of Christmas lights in there.”